How To Make Stereograms, Part 1: Creating a Repeating Background
Note: This is the first of many installments to fulfill a promise I made some time ago to share how I make my stereograms.
First step? Create a repeating background image.
Now, if you want, you can simply snag any existing repeating background image that you have available—for instance, at any of the sources mentioned in a previous tutorial. But if you’re going for a thematic stereogram, you’ll probably want a specific kind of background. Cases in point—I created a Matrix-like pattern for my spoons stereogram, a grass and sky pattern for my picnic table stereogram, and a star pattern for my moon stereogram. So, yeah, in case you want to do the same sort of thing, I’m showing you how to create your own repeating background.
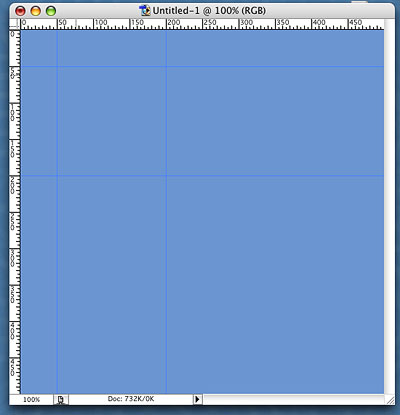
So here goes. Create a new document—whatever size you like, whatever color background. In this example, I have 500 x 500 pixel image with a sky blue color for the background. I have also set a group of guides (they’re the darker blue lines) in a corner so that I have a square for the shape I want to use for my pattern. To create the guides, you simply click and drag from the ruler (hit Ctrl-R or Cmd-R to view the ruler) onto the middle of the document.

In the next screenshot is my Custom Shape tool options. It’s a Photoshop feature available in version 6 and above, and I have no idea if PaintShopPro has anything like it. All it does, really, is allow me to use a saved shape over and over again, and in this case I’ve chosen a bird shape, and I’ve set it to pixels (instead of path or custom shape layer).

If you have nothing at all like the Custom Shape tool, use a custom-made paintbrush or copy and paste a selection from another image. It really doesn’t matter how you make the image, so long as it matches your theme. I use the Custom Shape tool only because it’s there, and it’s easy.
In the next step, I place my chosen custom bird shape in the square of guides that I made earlier, like so:

Okay, now the really important part of this first installment is this next step. Photoshop has an Offset filter, as shown below:

I use this filter to move the bird shape a bit to the right and below the original spot, so that I can later place another bird shape in the same square of guides. Here are the settings I use:

And here is what the image looks like as a result:

If I place another bird shape in the original square of quides I get this:

And if I repeat some of the steps above over and over again (shape, offset, shape, offset), I get this, until finally I get this:

From there, you can save the file or resize it, and you can use it as a pattern for whatever projects you have. See how easy it is? You’ve just finished the very first step in creating a stereogram by making your own repeating background.
If you like, you can download this sample pattern here and here.
Part 2 to come—when? I have no clue.
Share this post:
9 thoughts on “How To Make Stereograms, Part 1: Creating a Repeating Background”
Waiting with bated breath!
The pressure, the pressure! 🙂
Is the rest of this going to be completed? Its highly ranked on google for “stereogram tutorial”. The world eagerly awaits.
April,
Thanks for taking the time to post this tut. It’s exactly what I needed.
BTW….I just found out today that Levi’s 512 slim fits are back and have been for a year. I’ve been unhappy since my last pair died so I bought three!
Kathy
PLEASE HURRY UP. It took me – I swear – all my life until I came to your tutorial to learn to look at stereo grams. I followed your tutorial and now i need to complete this. PPPPPPLEASE, a glimpse?
Part 2 can be found here. 🙂
PLEASE HURRY UP. It took me – I swear – all my life until I came to your tutorial to learn to look at stereo grams. I followed your tutorial and now i need to complete this. PPPPPPLEASE, a glimpse?
omg i luv these thingzz
and i thought it would b cool to make my own so ya i figued …y not try it
(:D)
Over 5 years, I’ve been waiting … I’m such a patient guy…
Comments are closed.