How To Make Celtic Knots, the Quick and Easy Way
Osculate me. I’m a Celtic nut.
I’ve mentioned before my little penchant for making Celtic knots in Adobe Illustrator, and after I developed my own little way of making them I decided to look up other ways. I found a tutorial by Marc and Shelly Wallace, one by Christian Mercat, another by Yvonne and Stephen Hughes, and even a small collection of tutorials over at Craytech.
Frankly, all of the tutorials I found online make the art of Celtic knot design a pain in the ass. I’m a lazy artist—always have been, always will—so I constantly look for easier ways to do things, and it looked like I already had the easiest way to make Celtic knots: my way.
I know that not everyone has Adobe Illustrator, so the following tutorial shows how to make Celtic knots by hand, the quick and easy way. All you need is a highlighter pen, a black ink pen, paper, and some idea how you want your knots to look.
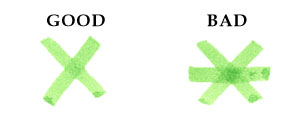
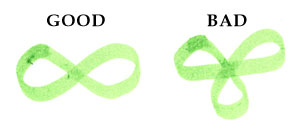
Preparation: Think about the knot design you’re going to draw. I would suggest looking at existing Celtic knotwork and studying the flow of each line as it weaves onto itself and onto intersecting lines. Don’t worry yet about the over-under patterns that are normally part of the design; we’ll get to that later. All you really have to worry about is that at each intersection, you should only have one crossing, where the lines radiate outward in no more than four directions. Here are samples of good and bad crossings:


Step one: On a clean sheet of paper, draw the basic lines of your Celtic knot using a highlighter pen. In my example, you see a one-line design.

Bear in mind that Celtic knots have an over-under pattern; if you follow a single line on an existing design, you’ll notice that each intersection alternates between going over what it intersects and going under what it intersects. The same rule applies when it intersects itself—over itself, then under itself, then over, then under. If you’ve drawn all your intersections correctly and you strictly follow the alternating over-under pattern, the whole thing should come out all right.
Step two: Start at one end of the design and trace a section of the line using a black ink pen. For the purposes of this tutorial, a section of line begins and ends where the line goes under in any crossing, so when you trace the line, you draw across just one intersection. (Imagine a pedestrian walking along the sidewalk of a street from one intersection to another, crossing just one other intersecting street, so that he walks two full blocks, on both sides of the street along which he is walking.)

Step three: Trace the next section, drawing across that same intersection at which you stopped when tracing the first section.

Step four: Trace the next section in the same manner.

Step five: Keep tracing until you’ve traced every edge of line, and voila, your Celtic knotwork is complete.

Ridiculously easy, wasn’t it?
Update 2003.06.21: Seems I’m not the only one who has thought of making Celtic knots this way. Jo Edkins already has a tutorial that uses similar techniques.
Share this post:
13 thoughts on “How To Make Celtic Knots, the Quick and Easy Way”
That’s actually pretty cool. You’re very clever, April.
again, gifts. thank you.
🙂
You’re truly a Celtic Knut!
nice-nice!
Very Nice! Ill have to try it out and let you know how it turns out.
Thank You!
I’m enjoying your tutorials. More, more!
Can you draw Don Knotts using that method?
oh, boy! another gift! a mug! cool!
Yay! As soon as I get some extra money in hand, I’m buying that mug.
😀
Well, thanks for refering to my site, but I’d say your technique only allows you to make small noodle plates. If you want more control on the relative size of things and so on, you’ll have to go for a more elaborate technique such as mine. So that you can easily produce standardized patterns you can combine, not only nice looking little things you stumble onto by chance…
Thanks for the plug! My webpage gives some other Celtic knot methods as well. In fact, looking at ‘real’ Celtic knots, in British and Irish medieval illuminated manuscripts, I’m pretty certain that your way was used by them. They often have a dark line outlining both sides of the main part of the strand, which is a bit of a give-away! The method I describe on my webpage was "acquired" from a British TV programme called Hart Beat, by Tony Hart who liked showing easy artisitc techniques for children. So, well done – you discovered it for yourself, where I just copied it from someone else! Oh yes, and you don’t just use it for small patterns. You can use it for as big patterns as you wish. It means that you can concentrate on the overall look of the design using just the lines, and worry about the under-and-overs afterwards. It’s also very good for copying designs from objects in museums – you just jot down the lines, and specify ONE under-and-over, and then you can regenerate the whole thing later. But to tell the truth, I don’t think there is a single method – again – looking at ancient Celtic knots, I think they used several methods. But your method is a good one! In particular, it frees the artist to draw smooth and interesting lines, rather than fussing too much about the formal design – which may tend to create a stiff and formal pattern.
this is cool! thanx much
IRELAND FOREVER!
thanx this helped me so much
Uhmm…….freak. xP It helped me a lot though. Nice site……but I still think you’re crazy >.>
Comments are closed.